In the world of photography, lighting is everything. It can make or break a shot, and for those of you setting up your own home photography studio, the importance of lighting cannot be overstated. But what exactly is the best lighting for a home studio? What type of equipment will you need? This article will walk you through everything you need to know about lighting in a home photography studio, from the different types of lights to the best ways to set up your space.
Understanding the Importance of Lighting in Photography
Before we delve into the specifics of studio lighting, it’s essential to understand why light is crucial in photography. The fundamental role of light in photography is to illuminate the subject, enabling the camera to capture the details and colors.
Also read : How to Design an Allergy-Friendly Bedroom with Hypoallergenic Materials?
Without light, there would be no photography. The term "photography" itself comes from Greek roots that mean "writing with light." Therefore, the type and quality of light you use in your studio can significantly impact your photos’ outcome.
There are many elements to consider when working with light, such as the direction, color, intensity, and quality. These factors can all influence the mood and tone of your photos. For instance, hard light can create dramatic shadows, while soft light tends to be more flattering and can soften skin tones and minimize imperfections.
Have you seen this : What Are the Best Tips for Creating a Child-Safe Living Room Layout?
Choosing the Right Type of Lighting for Your Studio
There are generally two types of lighting you can choose from for your home studio: continuous lighting and flash lighting.
Continuous lighting, as the name suggests, is light that remains on continuously. This type of lighting is excellent for beginners as it allows you to see exactly what your photo will look like before you take it. However, continuous lights can produce heat, which might be uncomfortable in a small home studio.
On the other hand, flash lighting only lights up when you take a photo. This type of lighting can offer more power and is less likely to cause discomfort due to heat. However, it might require some trial and error to get the correct exposure and lighting setup, as you can’t see the effect until after the photo is taken.
When deciding between continuous and flash lighting, consider what will work best for your specific needs and space.
Essential Lighting Equipment for a Home Studio
To set up a functional home photography studio, you’ll need more than just lights. Here’s a rundown of the essential lighting equipment you should consider.
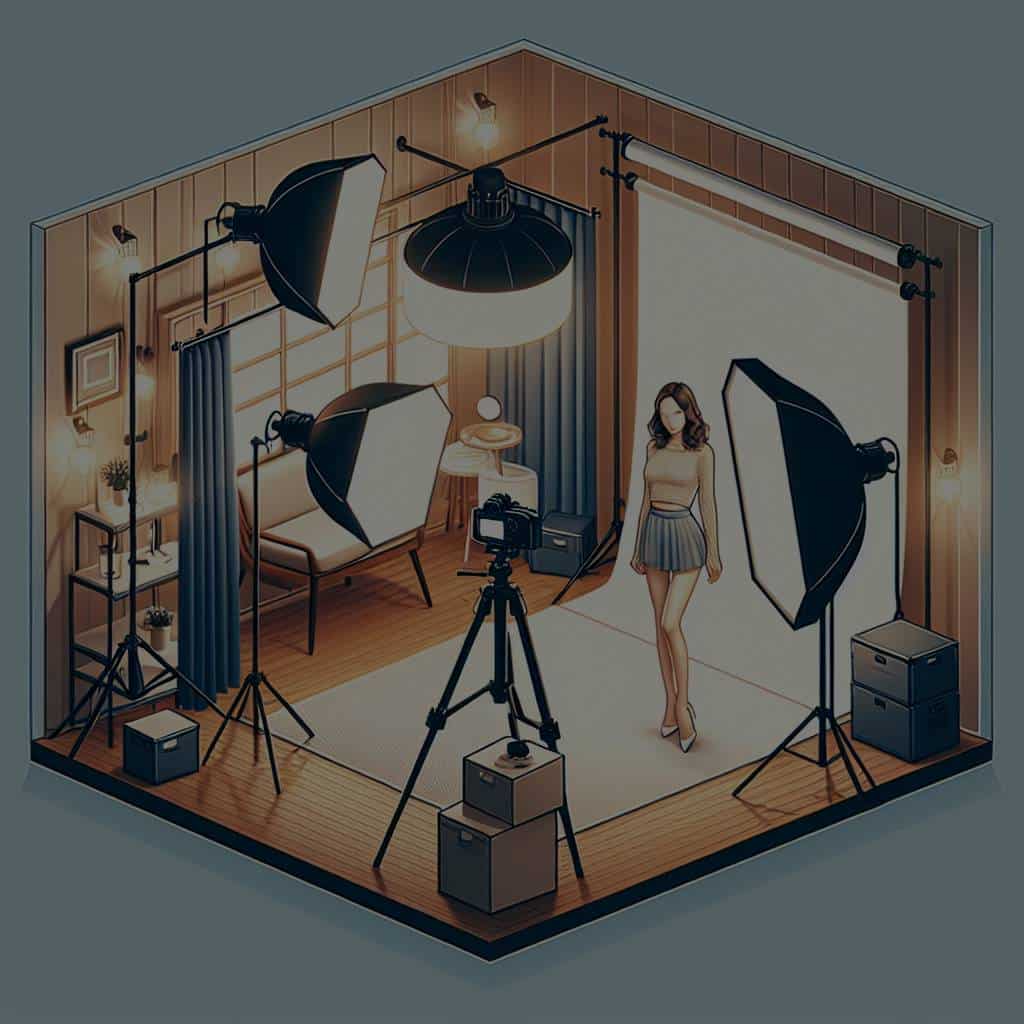
First off, you’ll need a main light, or "key light." This is the primary source of light in your photo and is usually the brightest. It’s typically placed in front of your subject, often at an angle, to create depth and dimension.
Next, you may want to consider getting a fill light. This light is used to fill in the shadows created by the key light. It’s generally not as bright as the key light and is placed on the opposite side of the camera.
A backlight, or "hair light," can also be a great addition to your setup. It’s positioned behind the subject and helps separate them from the background, giving the photo more depth.
Finally, don’t forget about light modifiers like umbrellas or softboxes. These tools can help soften and distribute light more evenly, providing a more flattering light for your subject.
Setting Up Your Studio Lights
Now that you know what kind of lighting equipment to get, you might be wondering how to set it all up. The placement of your lights can greatly affect the look and feel of your photos, so it’s important to get it right.
The classic three-point lighting setup is a good starting point. This involves setting up your key light, fill light, and backlight in a way that illuminates your subject from all angles and minimizes unflattering shadows.
Your key light should be placed at about a 45-degree angle from your subject, while the fill light should be on the opposite side, also at a 45-degree angle. The backlight can be placed directly behind the subject or slightly to the side.
Remember that these are just guidelines and you should feel free to experiment with different setups to achieve the look you’re going for. The best lighting setup is often the one that best suits your creative vision and the mood you want to convey in your photos.
Making the Most of Your Small Studio Space
Having a small studio space doesn’t mean you can’t achieve professional-quality lighting. With a little creativity and strategic planning, you can make the most of your space and still create stunning photos.
Choose compact and portable lighting equipment that’s easy to move and adjust. This will make it easier to try out different lighting setups in your space. Also, consider using reflectors to bounce light and fill in shadows without taking up additional space.
Remember, the goal isn’t to fill your space with as much equipment as possible, but to use what you have effectively. The best lighting for your home photography studio isn’t necessarily the most expensive or elaborate setup, but the one that best serves your needs and helps you create the photos you envision.
The Role of Natural Light in Home Studio Photography
Despite the fact that studio lights and modifiers offer an impressive range of control and consistency, one should not overlook the potential of natural light in a home studio setting. Natural light has unique qualities that can’t be fully replicated by artificial light sources and can often lead to stunning, organic results.
The immense advantage of natural light is its affordability and accessibility. You don’t need to invest in expensive lighting equipment to use natural light; instead, you can utilize windows, open spaces, and even mirrors to direct and control the light. This is not only cost-effective but also makes for an easier setup, especially for beginners who are just starting their journey in studio photography.
However, the use of natural light in studio photography does have its challenges. Unlike studio lights which offer full control over intensity, direction, and color temperature, natural light can be unpredictable and fluctuating. For instance, the light quality can change dramatically throughout the day, and factors like weather conditions and seasons can also influence the light’s color and intensity.
Overcoming these challenges usually requires a degree of flexibility and adaptability. You may need to adjust your shooting schedule to match the best light conditions, or use light modifiers like diffusers or reflectors to soften or redirect the light. Additionally, learning to master your camera’s settings to get the perfect exposure can be a valuable skill when working with natural light.
Despite these potential challenges, natural light can offer a unique and beautiful lighting option for your home photography studio, especially for portrait and product photography. It’s a versatile and accessible light source that, when used correctly, can produce breathtaking results.
How to Set Up Lighting for Different Types of Studio Photography
Different types of photography often require different lighting setups. Let’s look at how to set up your lighting for two common types of studio photography: food photography and portrait photography.
For food photography, the goal is usually to make the food look as appetizing as possible. This often requires a soft, diffused light to minimize harsh shadows and bring out the food’s textures and colors. A common setup is to use a large window as the main light source, supplemented with reflectors to fill in shadows. A backlight can also be used to create a bright, fresh look.
In portrait photography, the lighting setup often depends on the mood you want to create. For a traditional, evenly-lit portrait, a three-point lighting setup with a key light, fill light, and backlight can work well. However, if you want to create a more dramatic or moody portrait, you might choose to use a single light source and play with shadows to add depth and character to the image. Don’t forget about light modifiers, like softboxes or umbrellas, which can be used to soften the light and create a more flattering look.
Ultimately, the best lighting setup for your home photography studio will depend on your personal style, the type of photography you’re doing, and the mood you want to convey in your images. Experiment with different setups, light sources, and modifiers until you find what works best for you.
Conclusion
Setting up the ideal lighting for your home photography studio can seem daunting, but it doesn’t have to be. Understanding the basics of light and how it affects your photos, along with some knowledge about the different types of lighting equipment and techniques, can go a long way.
Whether you’re using continuous light, flash, natural light, or a combination of them all, the key is to know how to manipulate and control the light to achieve the desired effect. This could involve changing the direction or intensity of the light, using light modifiers, or even adjusting your camera settings. Remember, the best lighting setup is not necessarily the most expensive one, but the one that allows you to capture your vision effectively.
Take the time to experiment with different setups and equipment and don’t be afraid to make adjustments as needed. Your home studio is a space for creativity and expression, so make the most of it and let your photos shine!
